Below are my original quilt designs. Completed designs have a slide show of the quilt with a pdf pattern you can download. My current work-in-progress quilt design can be viewed in my Quilting Diary and will be added to this section when completed.
Blue Lagoon
[pdf
version]
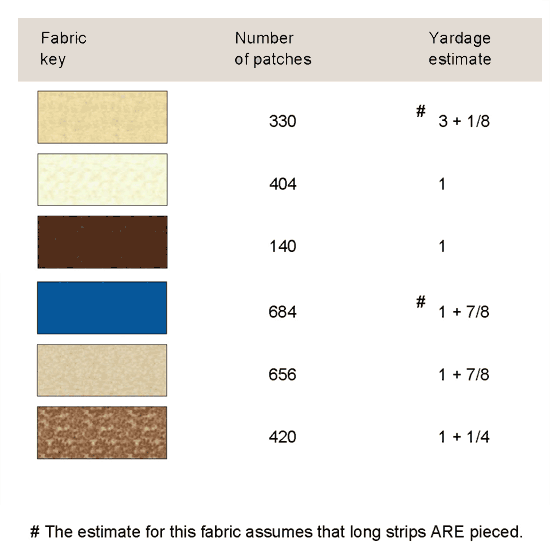
Fabric Requirements
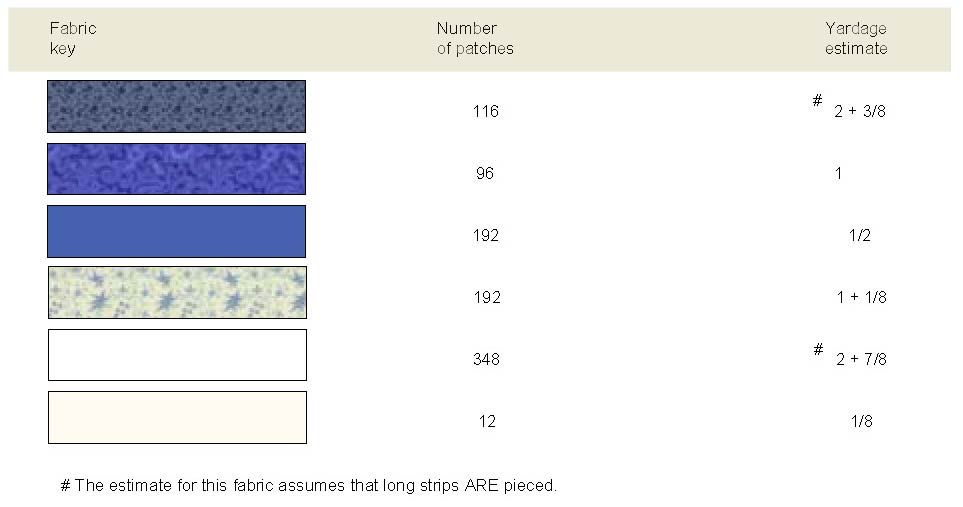
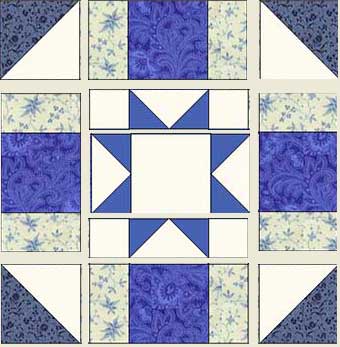
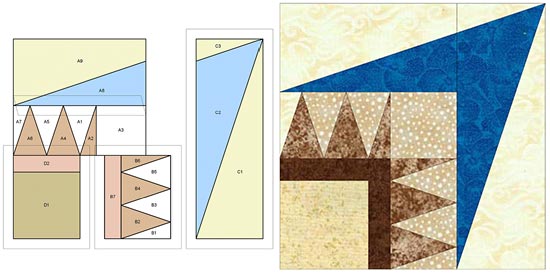
Army
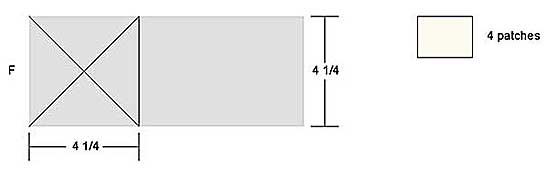
Star: make 24 blocks
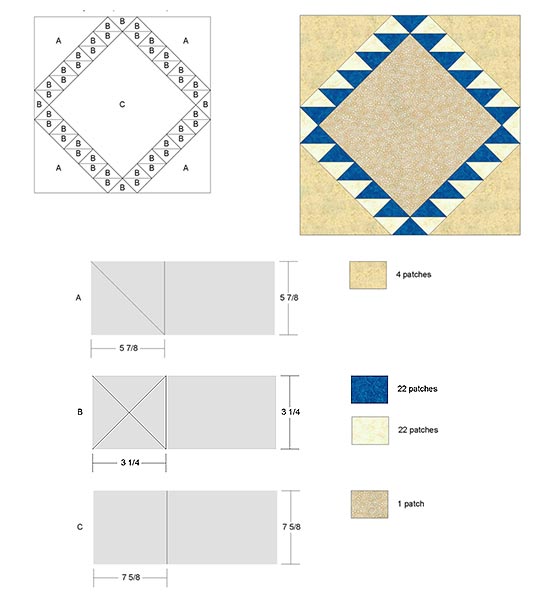
Diamond
in the Square: make 8 blocks
 >
>
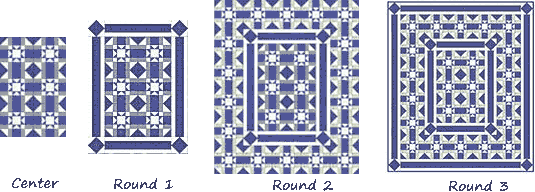
- Center: 6 Army Star blocks
- Assemble 6 Army Stars into 3 rows of 2 squares
- Round 1: 6-inch wide border with Diamond-in-the-Square block in each corner
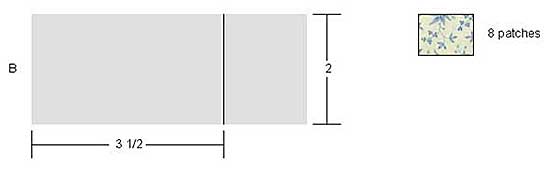
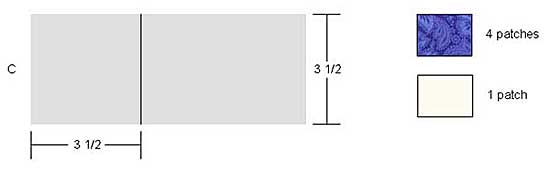
- Cut three strips of fabric 2 inches wide of one fabric and 3½ inches wide of the second fabric. Specific lengths for each strip are indicated in the pattern and depend on whether it is for the left/right side or top/bottom side of the round.
- Attach the left/right strip sections to the quilt top first.
- Attach corner blocks to the top/bottom strips.
- Attach the top/bottom strips to the quilt top.
- Round 2: 18 Army Star blocks
- Assemble 2 rows of 4 squares and 2 rows of 5 squares.
- Attach the rows of 4 squares to the left and right sides of the quilt top.
- Attach the rows of 5 squares to the top and bottom sides of the quilt top.
- Round 3: 6-inch wide border with Diamond-in-the Square block in each corner
- Cut three strips of fabric 2 inches wide of one fabric and 3½ inches wide of the second fabric. Specific lengths for each strip are indicated in the pattern and depend on whether it is for the left/right side or top/bottom side of the round.
- Attach the left/right strip sections to the quilt top first.
- Attach corner blocks to the top/bottom strips.
- Attach the top/bottom strips to the quilt top.
Note: This method of assembling the quilt top is conducive to the quilt-as-you go method of quilt assembling. You can add the batting and backing to each round as you go. Quilt that round then proceed with the next round.. If you are interested in trying this method, I have provided more detail in my Navajo Nation diary.
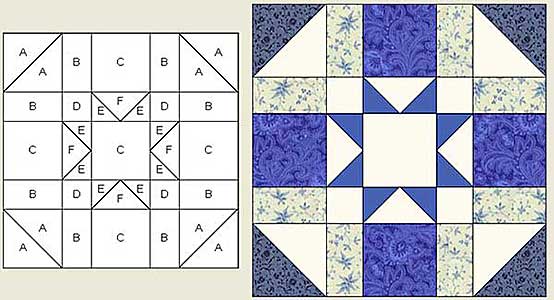
Assembly
[top]
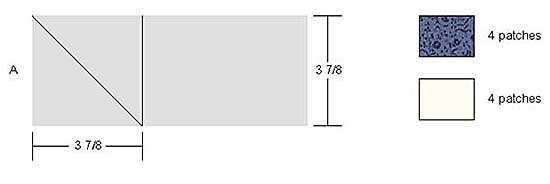
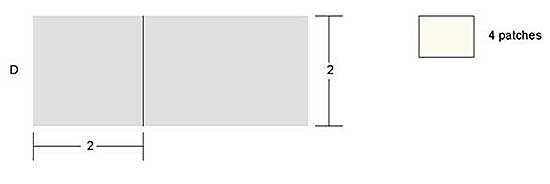
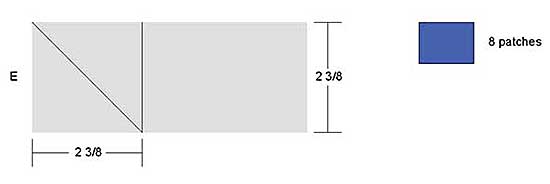
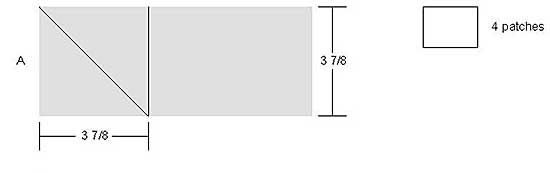
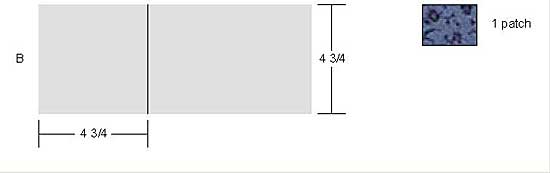
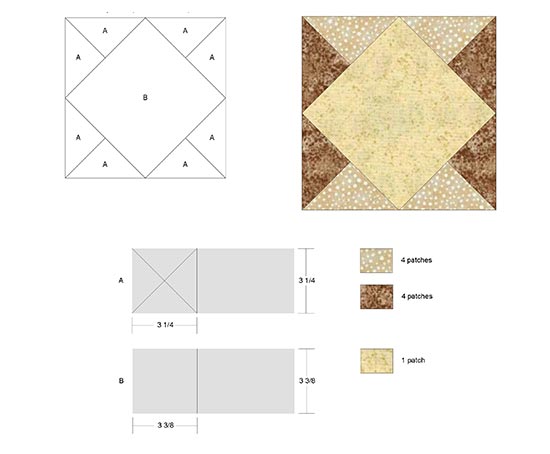
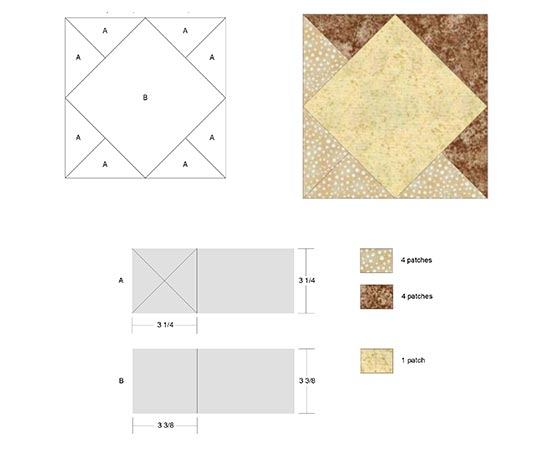
Diamond in the Square
Cutting Instructions
[pdf version]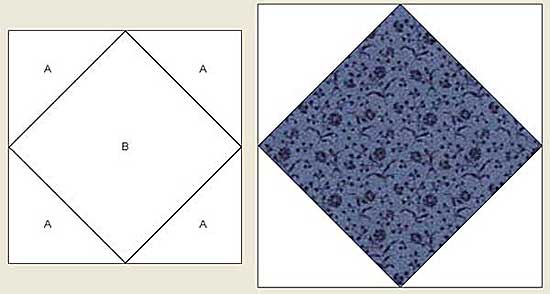
[top]
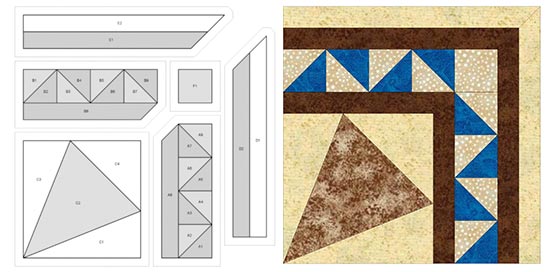
Navajo Nation
[pdf version]
Fabric Requirements
Navajo: make 16 squares
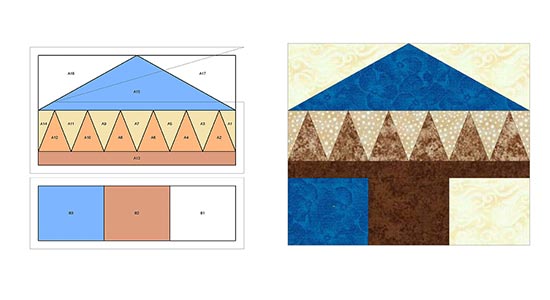
Tramp Art: make 12 squares
Tramp Art corners: make 4 squares
Sugar Bowl: make 54 squares
Sugar Bowl
corners: make 4 squares
Handkerchief: make 44 squares
Handkerchief corners: make 4 squares

- Center: 2 Navajo blocks
- Assemble 2 Navajo blocks and sew together.
- Round 1: 6-inch wide round with Tramp Art blocks and 1 inch outer fabric strip
- Paper piece 12 Tramp Art blocks and 4 Tramp Art corner blocks.
- Assemble 2 rows of 4 Tramp Art blocks and 2 rows of 2 Tramp Art blocks and 2 corner blocks
- Attach the left/right block (4 Tramp Art block strips) sections to the quilt top first.
- Attach the top/bottom strips to the quilt top.
- Cut 2 strips of fabric 1½ inches wide by 27 inches long and 2 strips of fabric 1½ inches wide by 39 inches long.
- Attach the 27-inch strips to the top and bottom of the quilt top after lining the center of the strips up with the center of the top. You should have 2½ inch tails on each end.
- Line the 39-inch strips to the left and right of the quilt top after lining the center of the strips up with the center of the top. You should have 2½ tails on each end (before attaching to the top and bottom strips. Begin sewing the left and right strips to the top starting just below the top/bottom strips (those will be mitered together.
- To finish the corners, line up the strip tails and sew a diagonal seam from the corner to the opposite edge at a 45 degree angle. Trim excess.
- Round 2: 14 Navajo blocks
- Assemble 2 rows of 3 blocks and 2 rows of 4 blocks.
- Attach the rows of 3 blocks to the left and right sides of the quilt top.
- Attach the rows of 4 blocks to the top and bottom sides of the quilt top.
- Round 3: 54 Sugar Bowl blocks and 4 Sugar Bowl corner blocks
- Assemble 2 rows of 15 Sugar Bowl blocks and 2 rows of 12 Sugar Bowl blocks.
- Attach the rows of 15 blocks to the left and right sides of the quilt top.
- Attach corner blocks to the top/bottom strips.
- Attach the top/bottom strips to the quilt top.
- Cut 4 strips ½ inch wide by 79 inches long of one fabric and 2 strips 1½ inches wide by 79 inches long of second fabric. Attach the ½-inch wide strips to each side of the 1½-inch strips. Attach the 79-inch combination strips to the left and right of the quilt after lining the center of the strips up with the center of the top. You should have 3½-inch tails on each end.
- Cut 4 strips ½ inch wide by 67 inches long of one fabric and 2 strips 1½ inches wide by 67 inches long of second fabric. Attach the ½-inch wide strips to the 1 ½ inch strips. Line the 67-inch combination strips up with the center of the top and bottom of the quilt top. You should 3½-inch tails on each end. Begin sewing the top and bottom strips to the top starting just below the left/right strips (those will be mitered together.
- To finish corners, line up the strip tails and sew a diagonal seam from the corner to the opposite edge of the strip at a 45 degree angle. Trim excess.
- Round 4: 44 Handkerchief squares and 4 Handkerchief corner squares
- Assemble 2 rows of 12 Handkerchief blocks and 2 rows of 10 Handkerchief blocks.
- Attach the rows of 12 blocks to the left and right sides of the quilt top.
- Attach corner blocks to the top/bottom strips.
- Attach the top/bottom strips to the quilt top.
Note: This method of assembling the quilt top is conducive to the quilt-as-you go method of quilt assembling. You can add the batting and backing to each round as you go. Quilt that round then proceed with the next round.
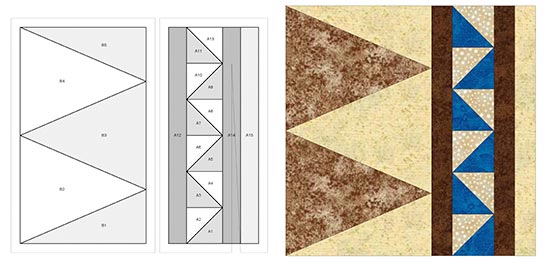
Navajo
Tramp Art
[Click here for pdf foundation pattern]
Tramp Art Corner
[Click here for pdf foundation pattern]
Sugar Bowl
Sugar Bowl Corner
Handkerchief
[Click here for pdf foundation pattern]
Handkerchief Corner
[Click here for pdf foundation pattern]
[top]
These designs are free for personal use but I retain the copyright on the quilt design. If you make a quilt using these designs, please permanently tag the quilt back with the name I have given the design and include my name. Example: "Blue Lagoon" Design by Linda Dufresne.
Web site use: You may post text links to my designs on your web site but may not publish or post the designs or graphics. You may post photos of quilts you yourself have made from my designs to your web site but the photos should clearly state the name of my design and that it is from Hobby Stash/Linda Dufresne.
You may not use these designs for any commercial purpose.
Quilt blocks I've used in my designs that are derived from other sources are clearly indicated and are not part of my copyright. You may certainly use these blocks in your own designs. I highly recommend you stop by Quilter's Cache! Marcia Hohn has spent years developing one of the best online resources for quilt blocks. I highly recommend it for getting your creative juices flowing.